
OpenAI opened the ChatGPT app directory to public submissions and the program is moving fast: 150 apps accepted in the last two weeks, with around 500 more in the queue. ChatGPT has roughly one billion weekly users, and discoverability features are rolling out so apps will surface inside conversations when they're relevant to the user's task. For anyone running an MCP server, the directory is the most direct path to that audience.
An MCP app is an MCP server that ChatGPT connects to and calls as a tool, optionally rendering an interactive widget inside the conversation. Once your app is listed, anyone using ChatGPT can install it without additional setup on their side. That's the upside. The downside is that the submission form isn't visible until you have access, and several of its steps are blocking: if your org isn't verified, your domain token isn't being served, or your OAuth login doesn't go through, you can't progress to the sections that come after.
This post is the whole flow up front, with screenshots from our Image Generation submission: every section, the prerequisites to have ready before you open the form, and the patterns that bounce submissions. Useful whether you're submitting now, building an MCP server with the directory in mind for later, or stuck on a blocking step and wanting to see what's behind it.
The official reference for the form is OpenAI's Submitting apps to the ChatGPT app directory.
The six sections of the form
The ChatGPT Apps submission flow has six steps. The draft auto-saves, so you can stop and resume.
- App Info
Public listing: name, subtitle, description, category, logo, and URLs.
- MCP Server
Public /mcp endpoint, auth mode, tool justifications, and domain verification.
- Testing
Test credentials with no 2FA, plus 5 positive and 3 negative test cases.
- Screenshots
1 to 4 images at 706px wide, 2x retina, showing your widget UI in use.
- Global
Locales and allowed countries. Usually leave both at the defaults.
- Submit
Release notes, Individual or Business, policy checkboxes, mature-content flag.
Reviews typically take one to two weeks, longer if screenshots or test cases come back for revisions.
Run this guide through your coding agent
Paste this page into a coding agent that has access to your repo (Claude Code,
Cursor, Windsurf, etc.) and ask it to verify your app against the
requirements. Unlike a chat assistant, it can actually inspect your tool
annotations, hit your /mcp endpoint, check screenshot dimensions on disk,
and confirm your privacy and terms URLs resolve.
Prerequisites
Have these ready before you open the form. Missing any of them will block you mid-submission.
A verified OpenAI organization. Go to platform.openai.com → Settings → Organization → General and complete verification. This is required to submit, and verification itself can take a couple of days. If you're submitting as a business, also complete business verification on the same page.
A publicly deployed MCP server. Localhost won't work. The platform needs to reach your
/mcpendpoint to scan tools and verify your domain. To scaffold and deploy quickly, runnpx create-mcp-use-appand host on Manufact Cloud.Annotations on every tool. Each tool in your server must declare
annotations(Read Only, Open World, Destructive). Tools without annotations fail OpenAI's scan and block submission.A working test account if your app has a login. You'll need it twice. In Step 2, OAuth apps require you to log in from inside the submission flow so OpenAI captures tokens for review. In Step 3, you provide a username and password that reviewers can use to test the app themselves. The Step 3 credentials must work immediately, with no account creation, no 2FA, and immediate access to a demo account. Prepare a dedicated demo account with the permissions your tools need.
A domain you control. You'll need to host a verification token at
/.well-known/openai-appson the same domain that serves your MCP endpoint. Vercel preview URLs and shared subdomains you don't own won't work.A square PNG logo. No manual borders or rounded corners (the platform applies circular cropping). Required to leave the first section.
Screenshots at exactly 706px wide, 2x retina quality (minimum 400px tall, recommended max 860px). Show your widget UI in use; do not bake the user prompt or model response into the image (those are rendered separately by OpenAI). Use the public Figma template.
A demo recording URL covering both web and mobile. A single video walking through your main use cases on web and on mobile (iOS, Android). Required and not waivable.
Stable Privacy Policy and Terms of Service URLs. Public, working pages. Placeholders and 404s get rejected.
For canonical, field-level guidance, see OpenAI's Submitting apps to the ChatGPT app directory.
Opening the form
Go to platform.openai.com and find ChatGPT Apps in the left sidebar under "Manage." This is the apps dashboard, listing your existing apps and their review statuses. Click + New App in the top right. The stepper at the top of the new form shows your progress across all six sections.
Step 1: App Info
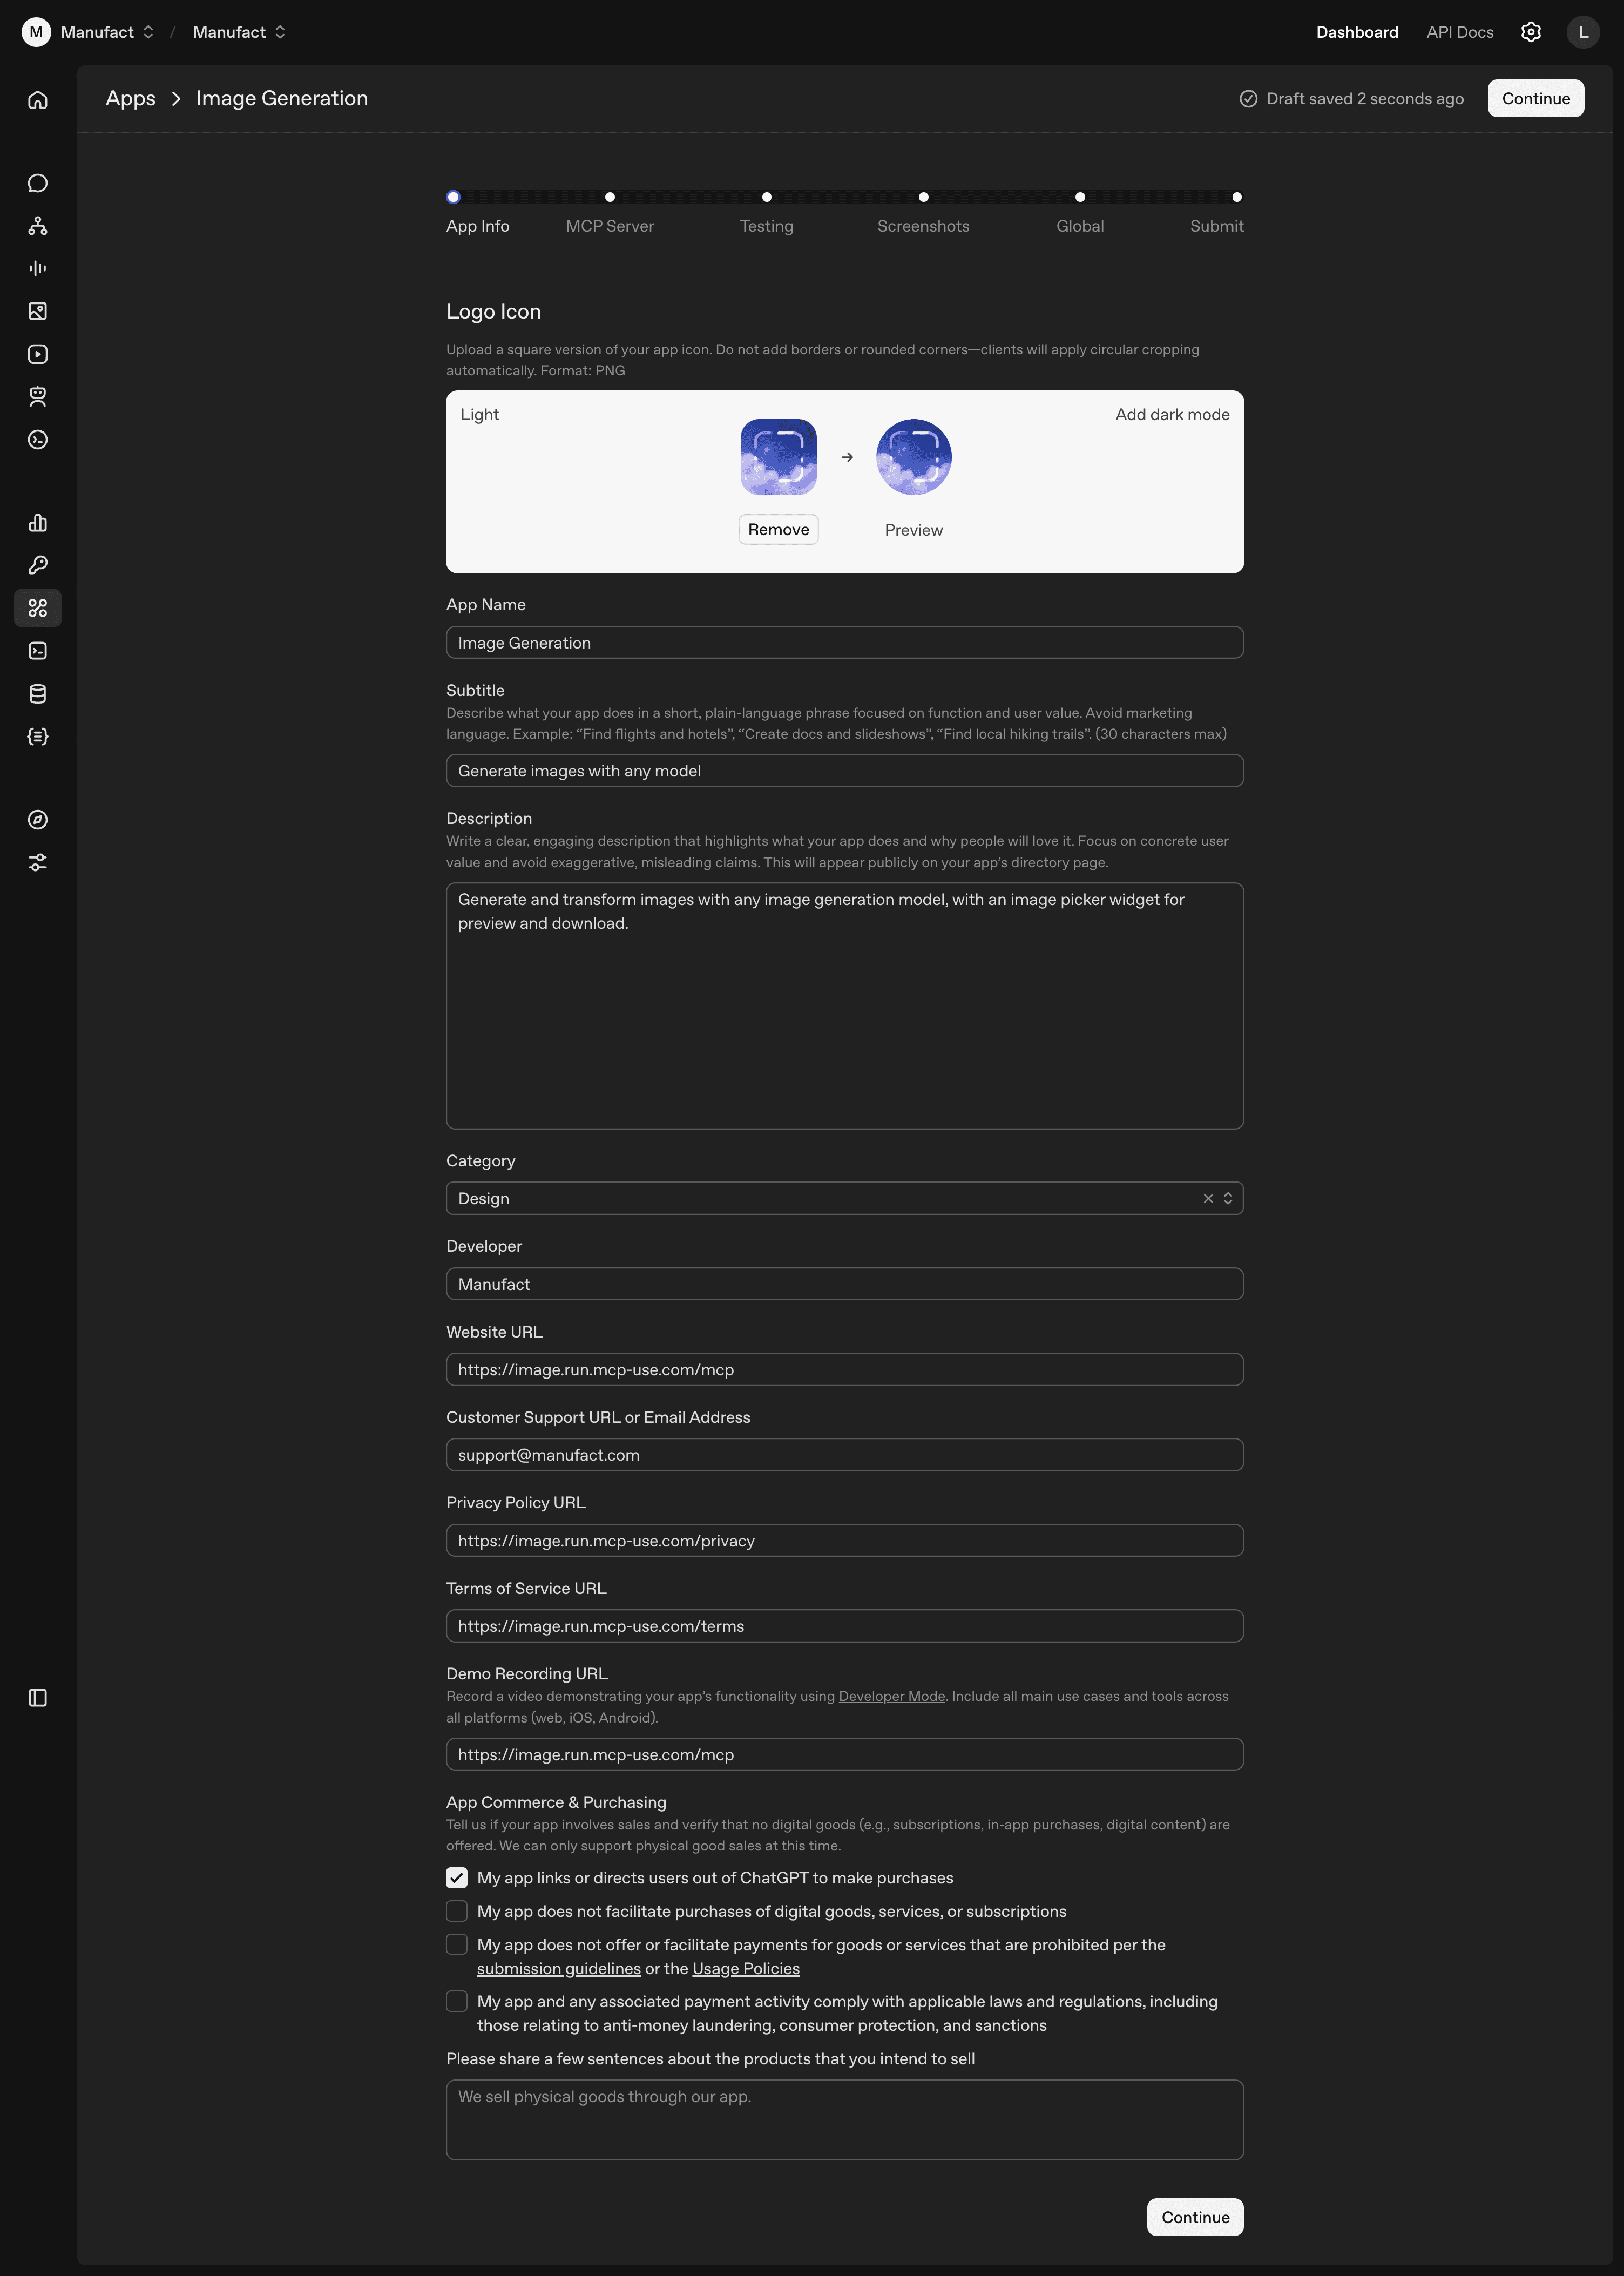
This section becomes your public directory listing. Most of the fields are self-explanatory; a few are not.
Subtitle is capped at 30 characters and should be plain language, not marketing. The form's own examples are "Find flights and hotels", "Create docs and slideshows", "Find local hiking trails".
The Developer field reflects whether your OpenAI org is verified. Verified orgs get the org name on the listing. Unverified accounts fall back to a username.
Privacy Policy and Terms of Service must be public, stable URLs. Placeholder pages and 404s are an automatic rejection.
The Demo Recording URL requires a single video covering web and mobile (iOS, Android), recorded with ChatGPT's Developer Mode. Web-only recordings get bounced.
The App Commerce & Purchasing checkbox should stay unchecked unless your app links users out to buy a physical good. Digital goods, subscriptions, and in-app purchases aren't supported. Checking the box adds several compliance disclosures and a free-text field about what you sell.
Step 2: MCP Server
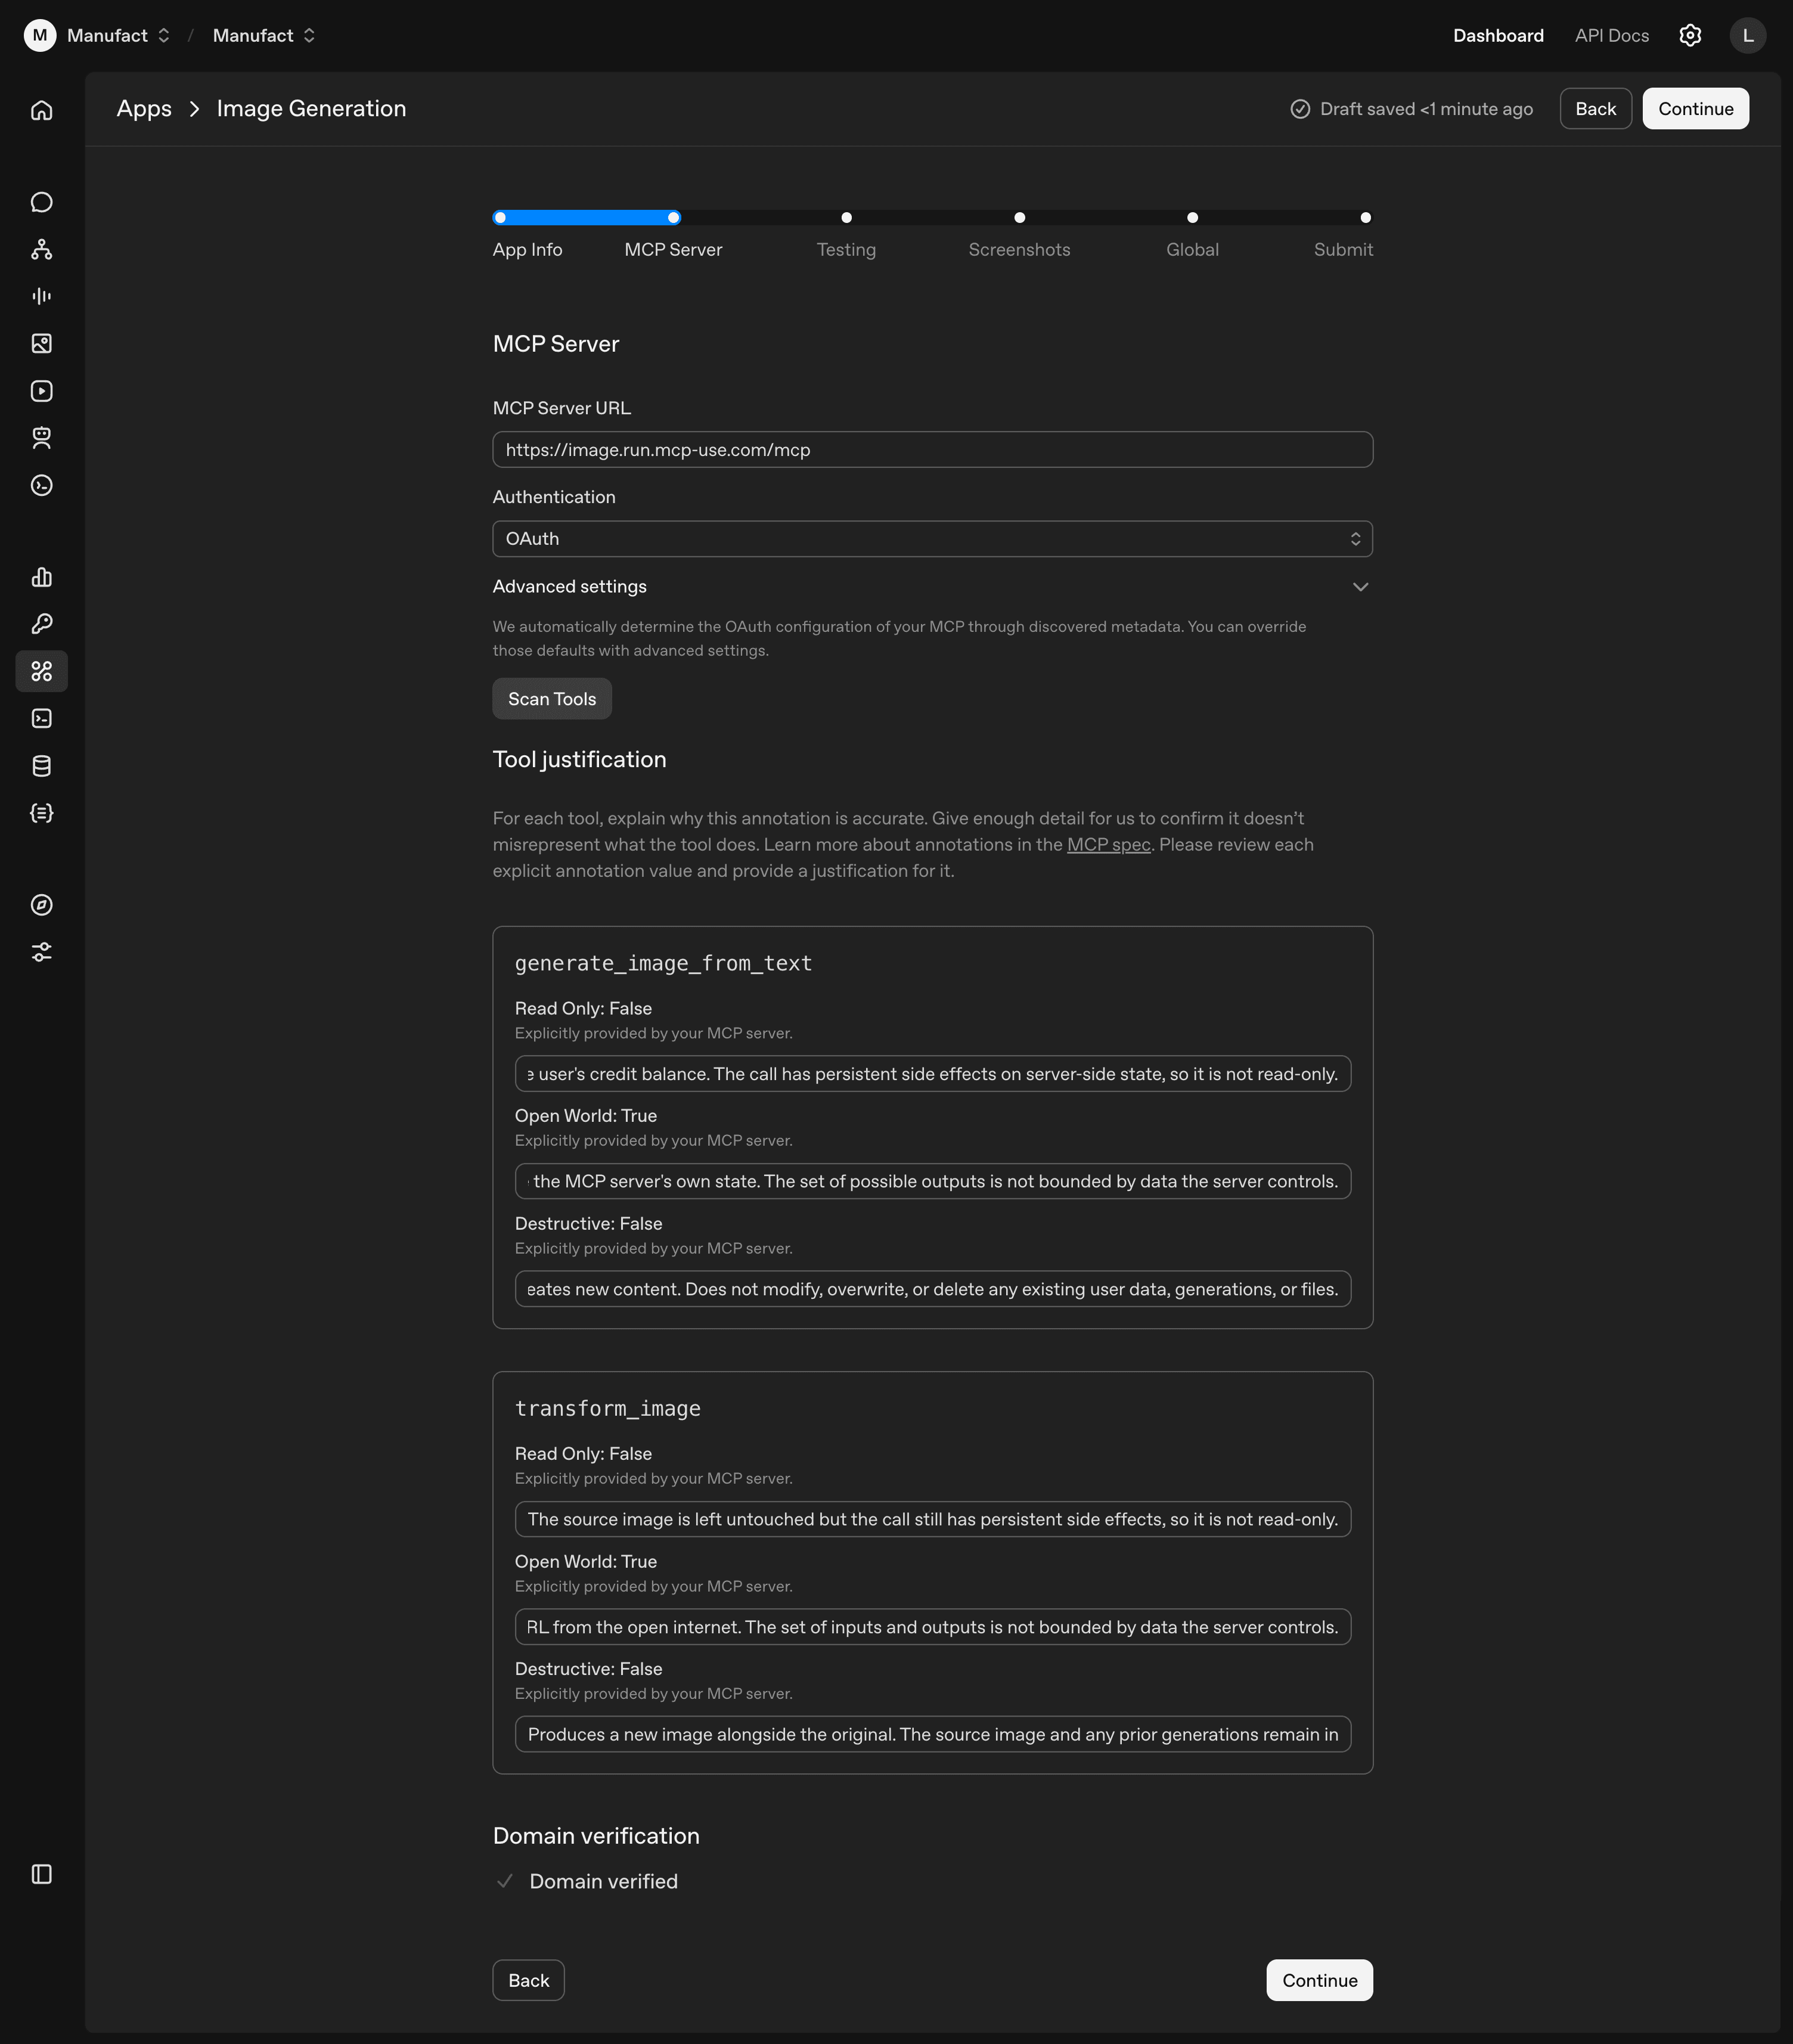
Server URL and auth mode
Enter the full URL to your MCP server endpoint, ending in /mcp:
https://your-app.run.manufact.com/mcpSelect your authentication method (No Auth, OAuth, etc.). For public servers without authentication, choose No Auth. For OAuth, the platform auto-detects your configuration from your server's discovered metadata; expand Advanced settings below the dropdown if you need to override the defaults.
OAuth submission flow
OAuth apps require a login from inside the submission flow. OpenAI captures the tokens for review. Use a dedicated test account with the permissions your tools need.
Using a coding agent?
Install our MCP-builder skill to get help building MCP servers: npx skills add https://github.com/mcp-use/mcp-use --skill mcp-builder
Scan tools
Click Scan Tools. The platform connects to your server and discovers exposed tools. When it completes, a "Tool justification" section appears.
Tool justifications
Every tool on your server must declare annotations (readOnly, openWorld, destructive) in code. Tools without them fail the scan. The full spec is in OpenAI's Tool annotations and elicitation. Apps scaffolded with npx create-mcp-use-app already include them.
The form displays the three booleans as read-only values pulled from your server. You can't change them here; you write a one-sentence justification for each. For generate_image_from_text with Read Only: False: "The call charges the user's credit balance and persists output to server-side state."
Reviewers compare your justifications against the tool's actual behavior during testing. A wrong annotation has to be fixed in code and redeployed before re-scanning.
Domain verification
Below the tool justifications, the domain section starts as "Domain not verified". The platform generates a unique token and shows you where to host it.
- Copy the verification token.
- Host the token as plain text at
/.well-known/openai-appson your domain. - Deploy or restart your server so the file is reachable.
- Click Verify Domain. On success, the red message turns green.
Step 3: Testing
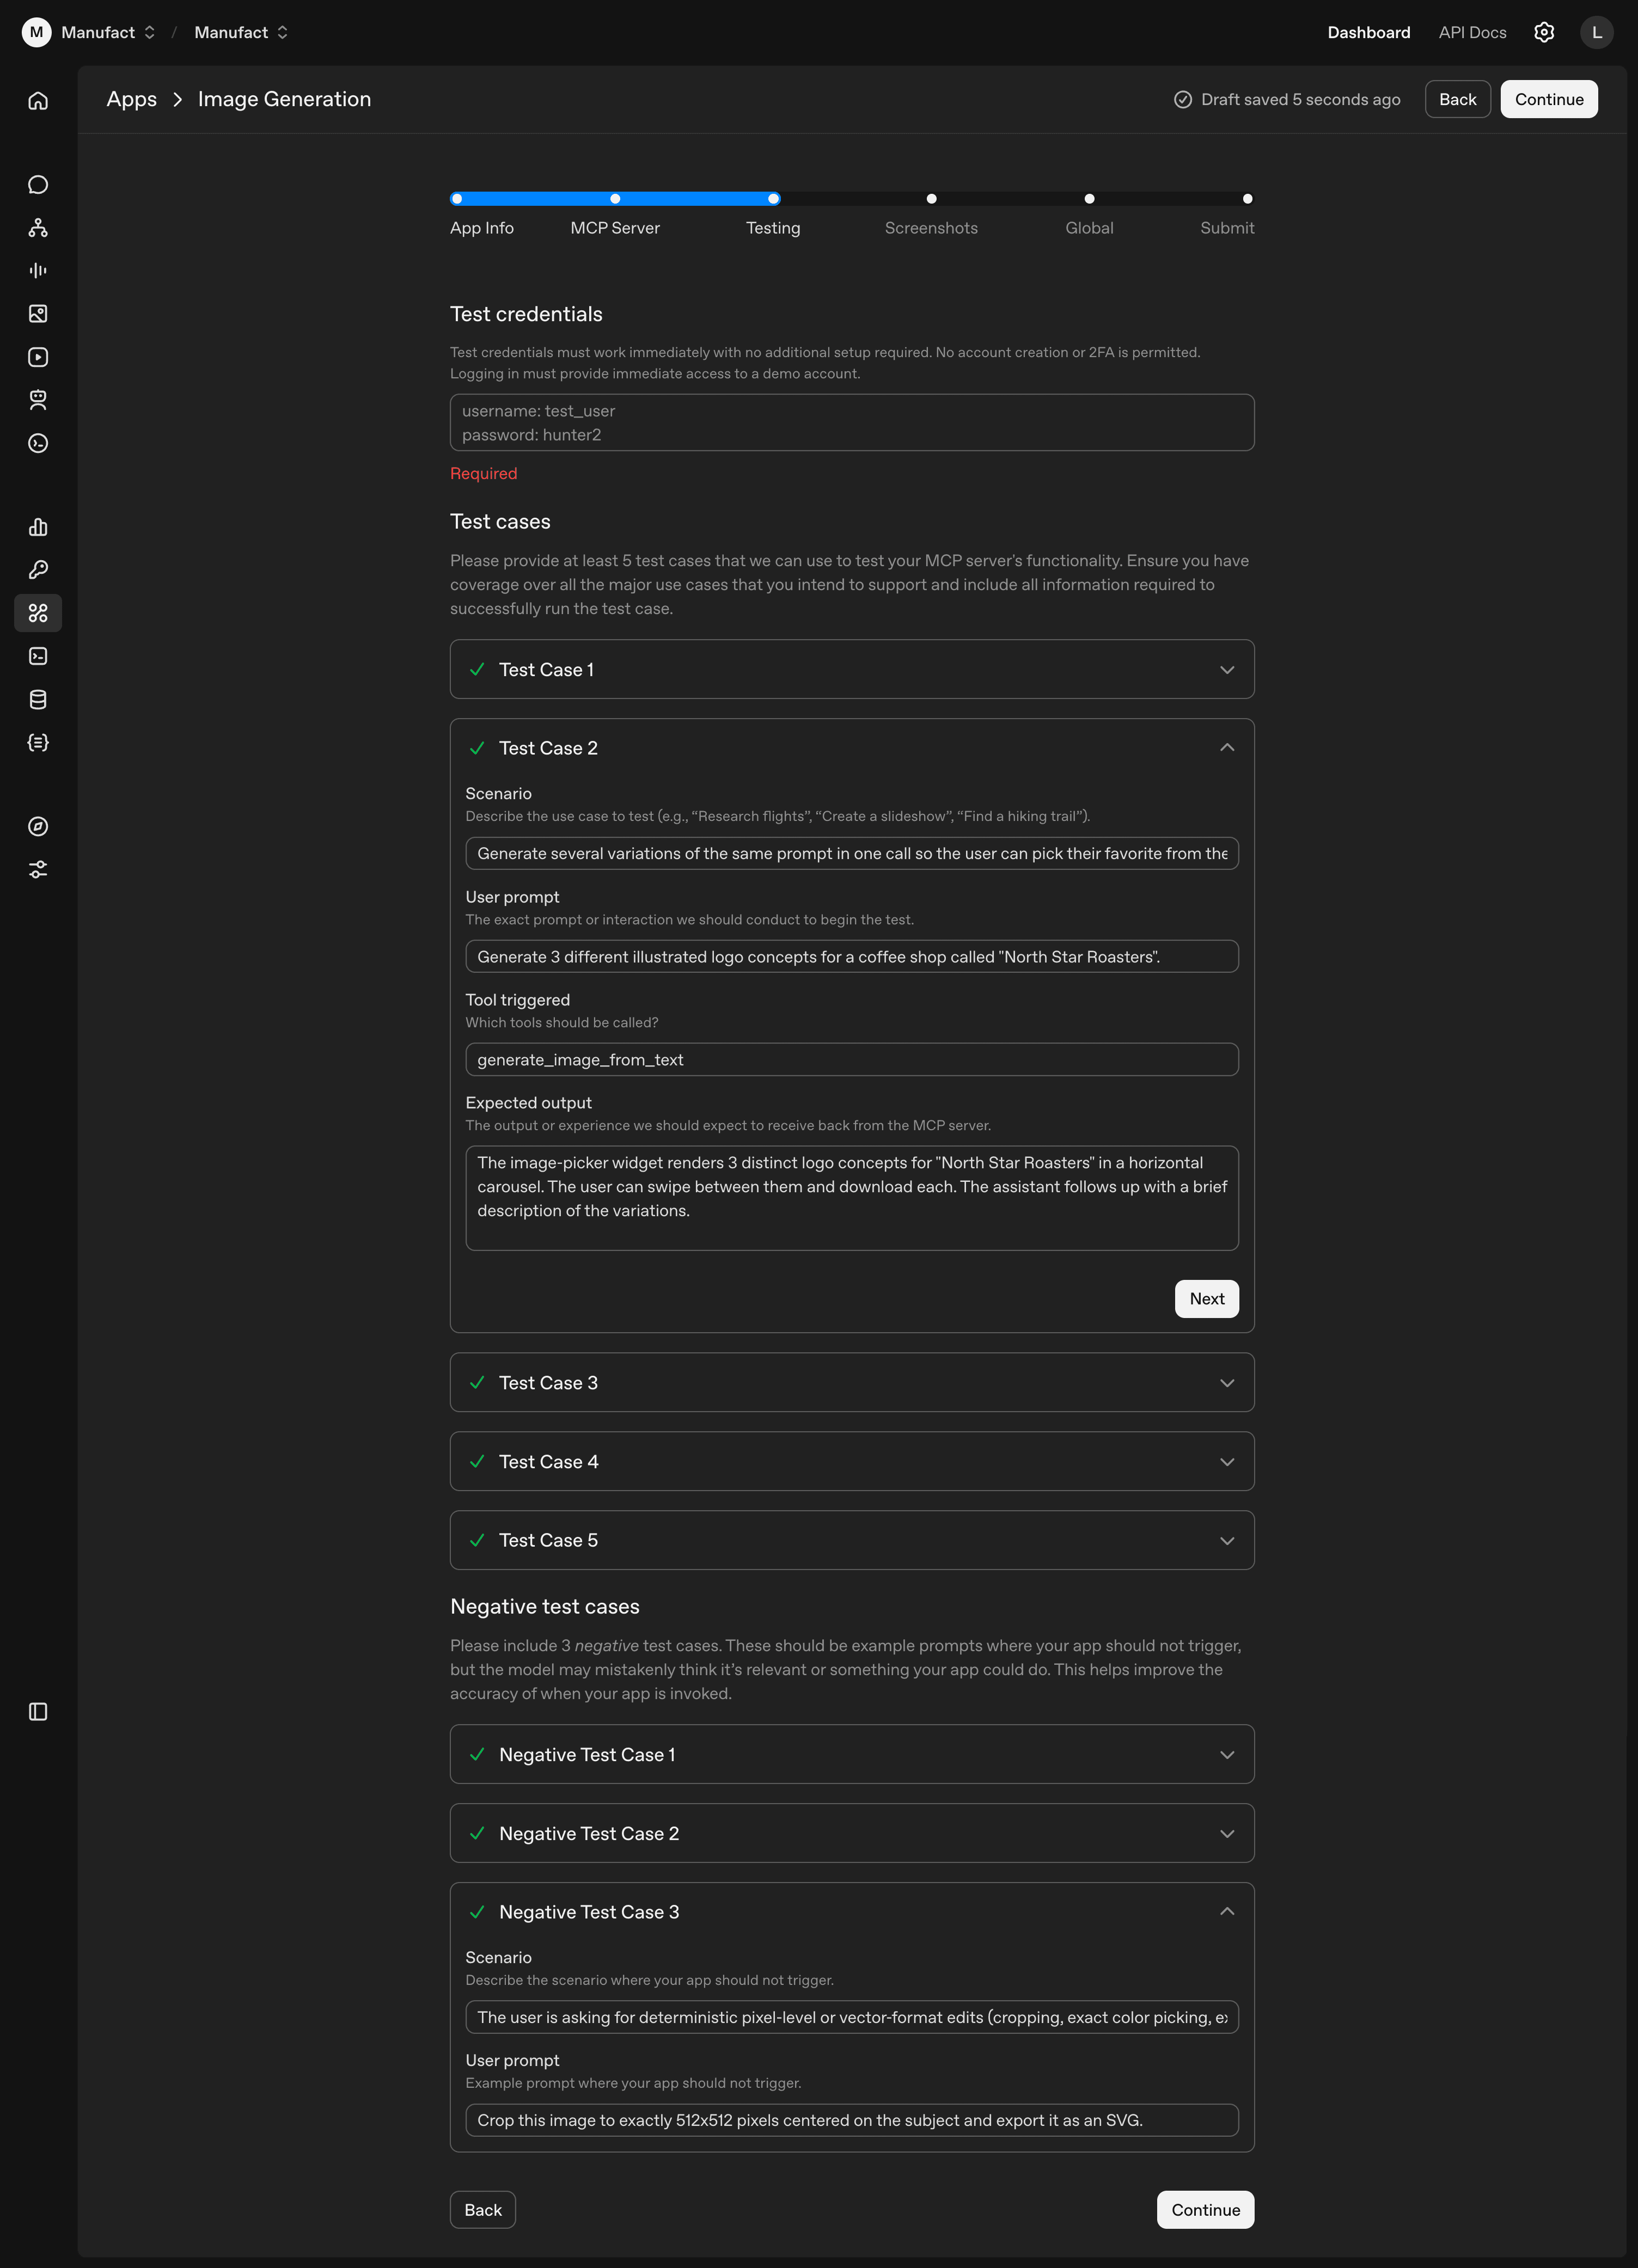
Test credentials and test cases for OpenAI's reviewers. Minimum 5 positive and 3 negative.
Test credentials
Plain-text username and password, required at the top of this step:
username: test_user
password: hunter2
Constraints from the form: must work immediately, no account-creation flow, no 2FA. Use a dedicated demo account, separate from the one you used for OAuth in Step 2.
Positive test cases
Scenarios where your app should work. Each has a scenario, a user prompt, the expected tool call, and an expected output. Cover every tool on your server in at least one case. Use specific prompts (real entities and numbers) so reviewers can tell when a case passes:
| Field | Example |
|---|---|
| Scenario | Generate several variations of the same prompt in one call so the user can pick their favorite |
| User prompt | Generate 3 different illustrated logo concepts for a coffee shop called "North Star Roasters" |
| Tool triggered | generate_image_from_text |
| Expected output | The image-picker widget renders 3 distinct logo concepts for "North Star Roasters" in a horizontal carousel. The user can swipe between them and download each. The assistant follows up with a brief recap. |
Negative test cases
Prompts that look like they might match your app but shouldn't trigger it. Generic out-of-scope requests ("what's the weather") aren't useful here; the form wants prompts adjacent to your actual scope. For an image-generation app, deterministic pixel edits and vector-format exports qualify:
| Field | Example |
|---|---|
| Scenario | Deterministic pixel-level or vector-format edits (cropping, exact color picking, SVG export) |
| User prompt | Crop this image to exactly 512x512 pixels centered on the subject and export it as an SVG |
Set the Tool triggered field to None.
Step 4: Screenshots
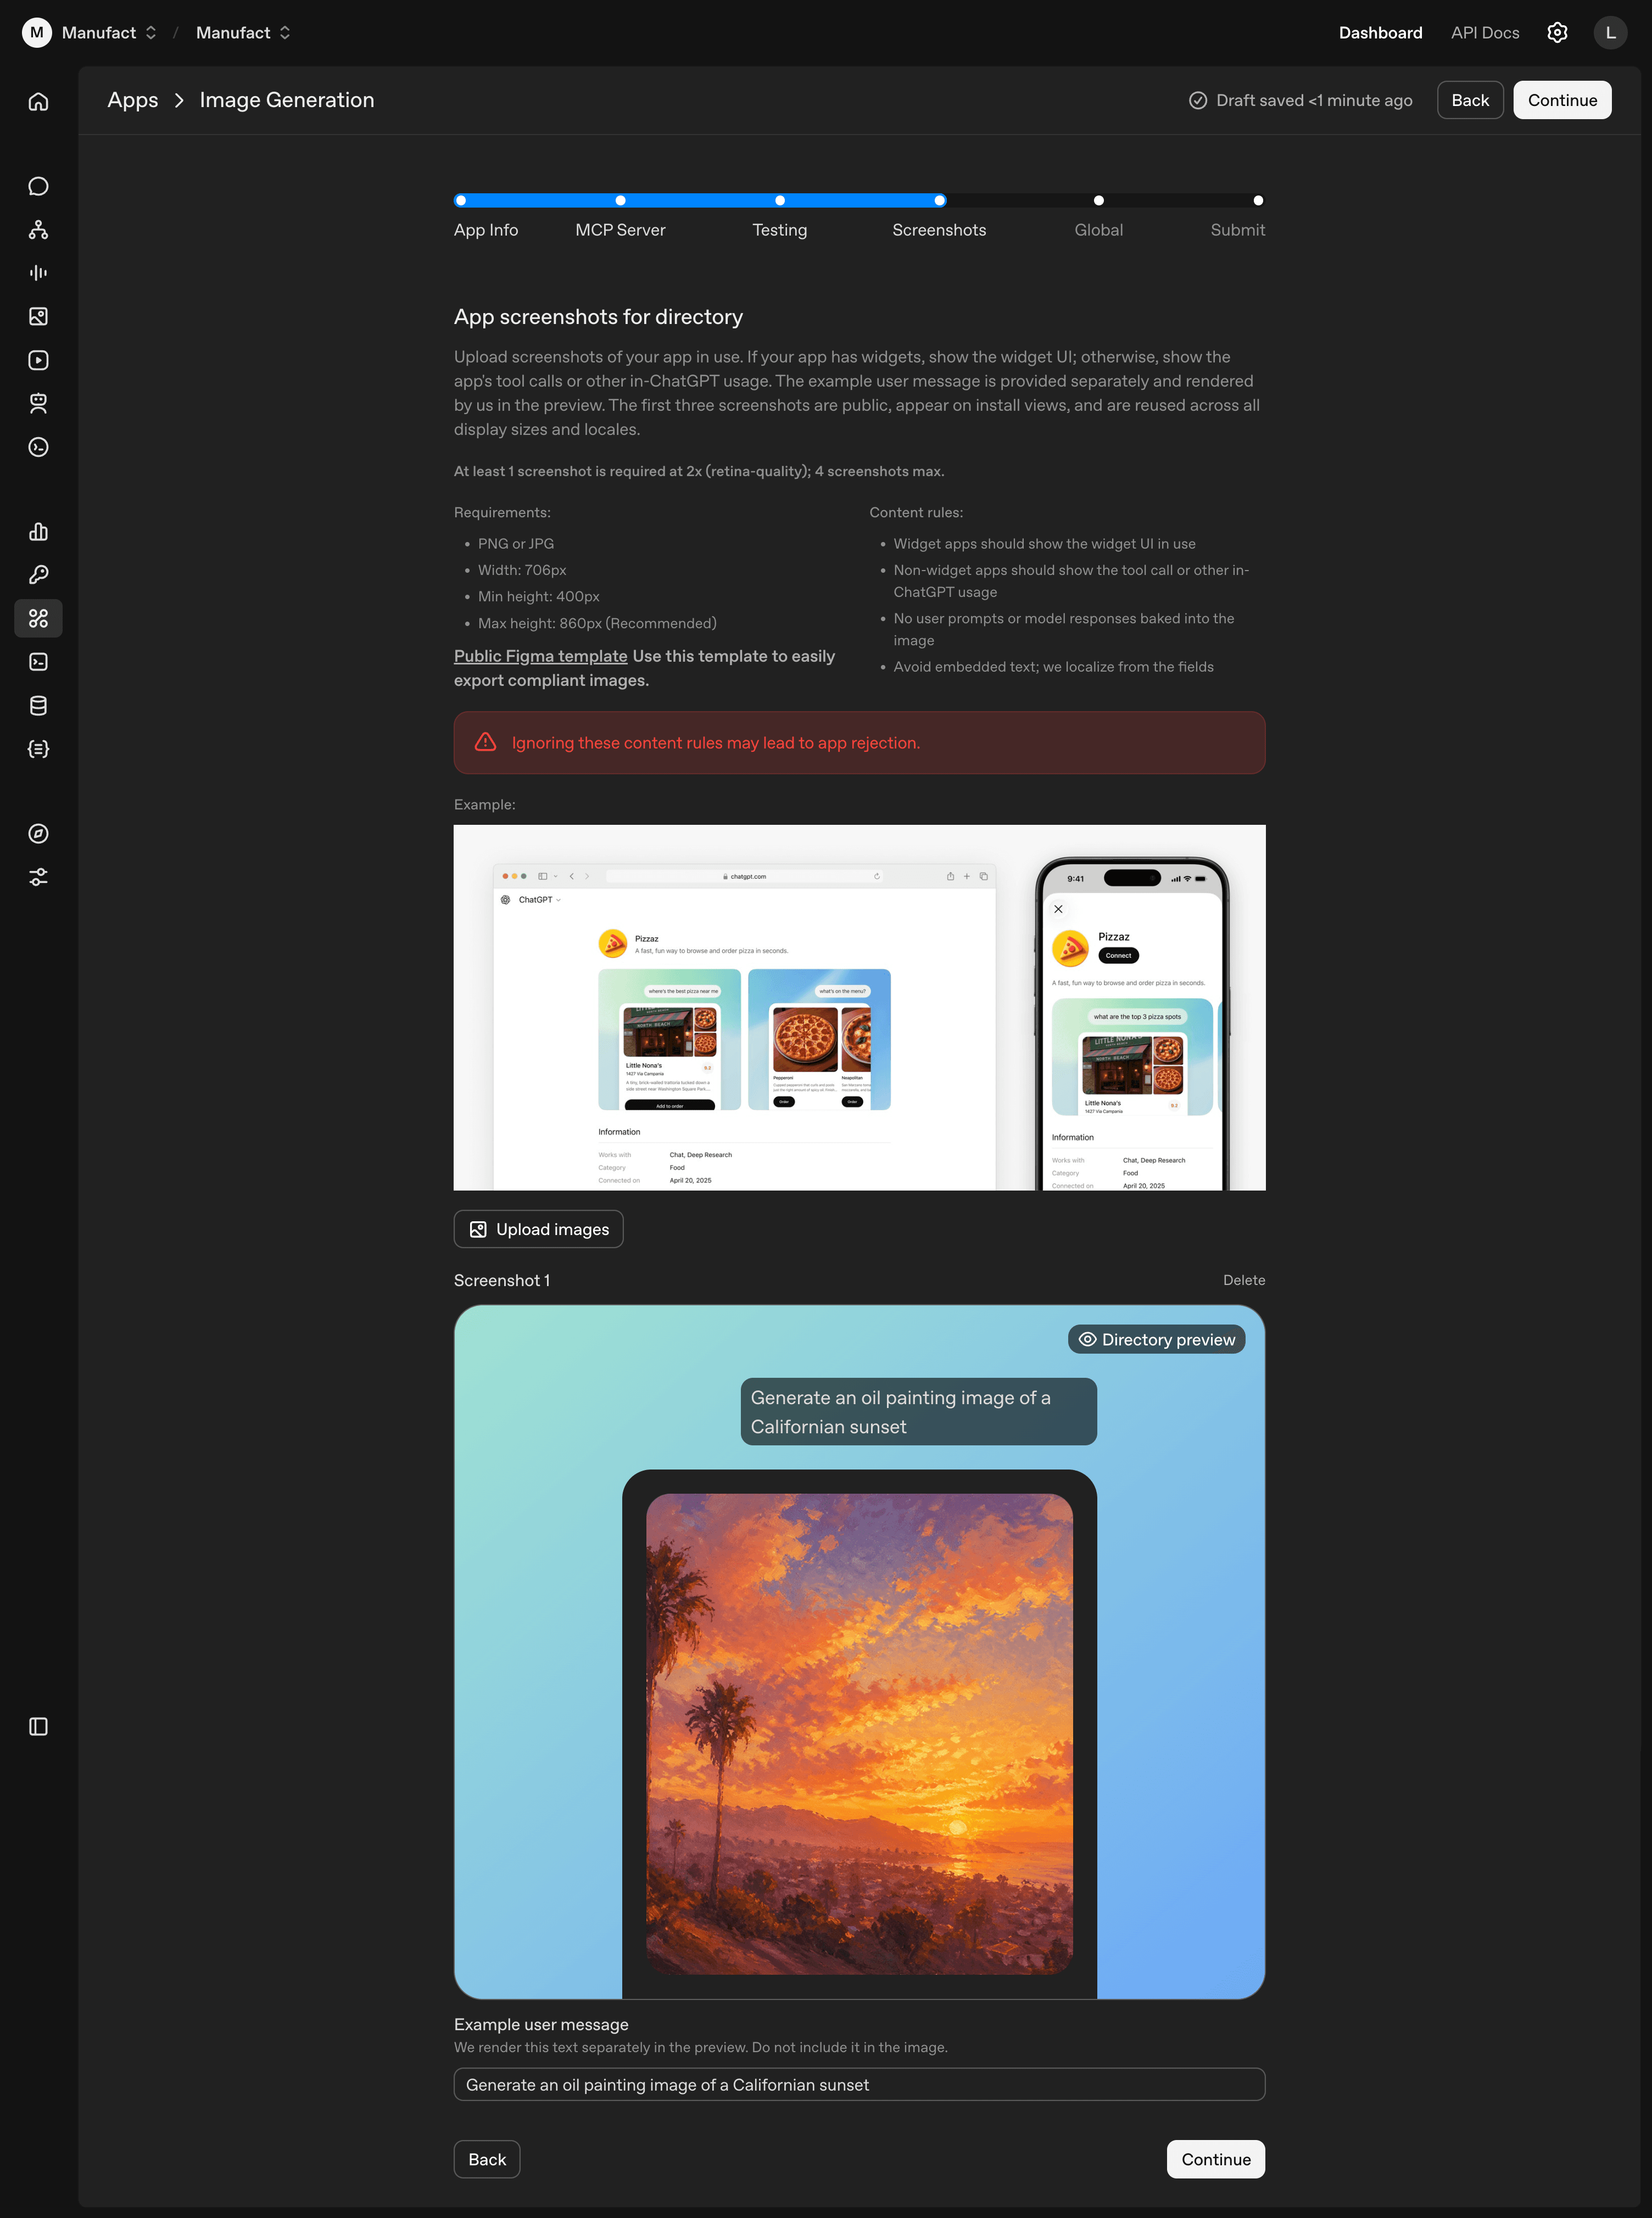
Between 1 and 4 PNG or JPG screenshots at exactly 706×800px (the dimensions you get from exporting the Figma template at 2x). The first three are public and reused across all display sizes and locales on install views, so put your strongest first.
Use the public Figma template. The frame is 353×400px; export at 2x to get the required 706×800px file. Stick to these dimensions exactly: if the file isn't right, the upload fails silently with no error message.
Two content rules matter: don't bake the user prompt or model response into the image, and don't embed text. OpenAI renders the prompt separately (via the Example user message field on each screenshot, e.g. "Generate an oil painting image of a Californian sunset") and localizes the listing from the form fields, so embedded text won't be translated.
Step 5: Global
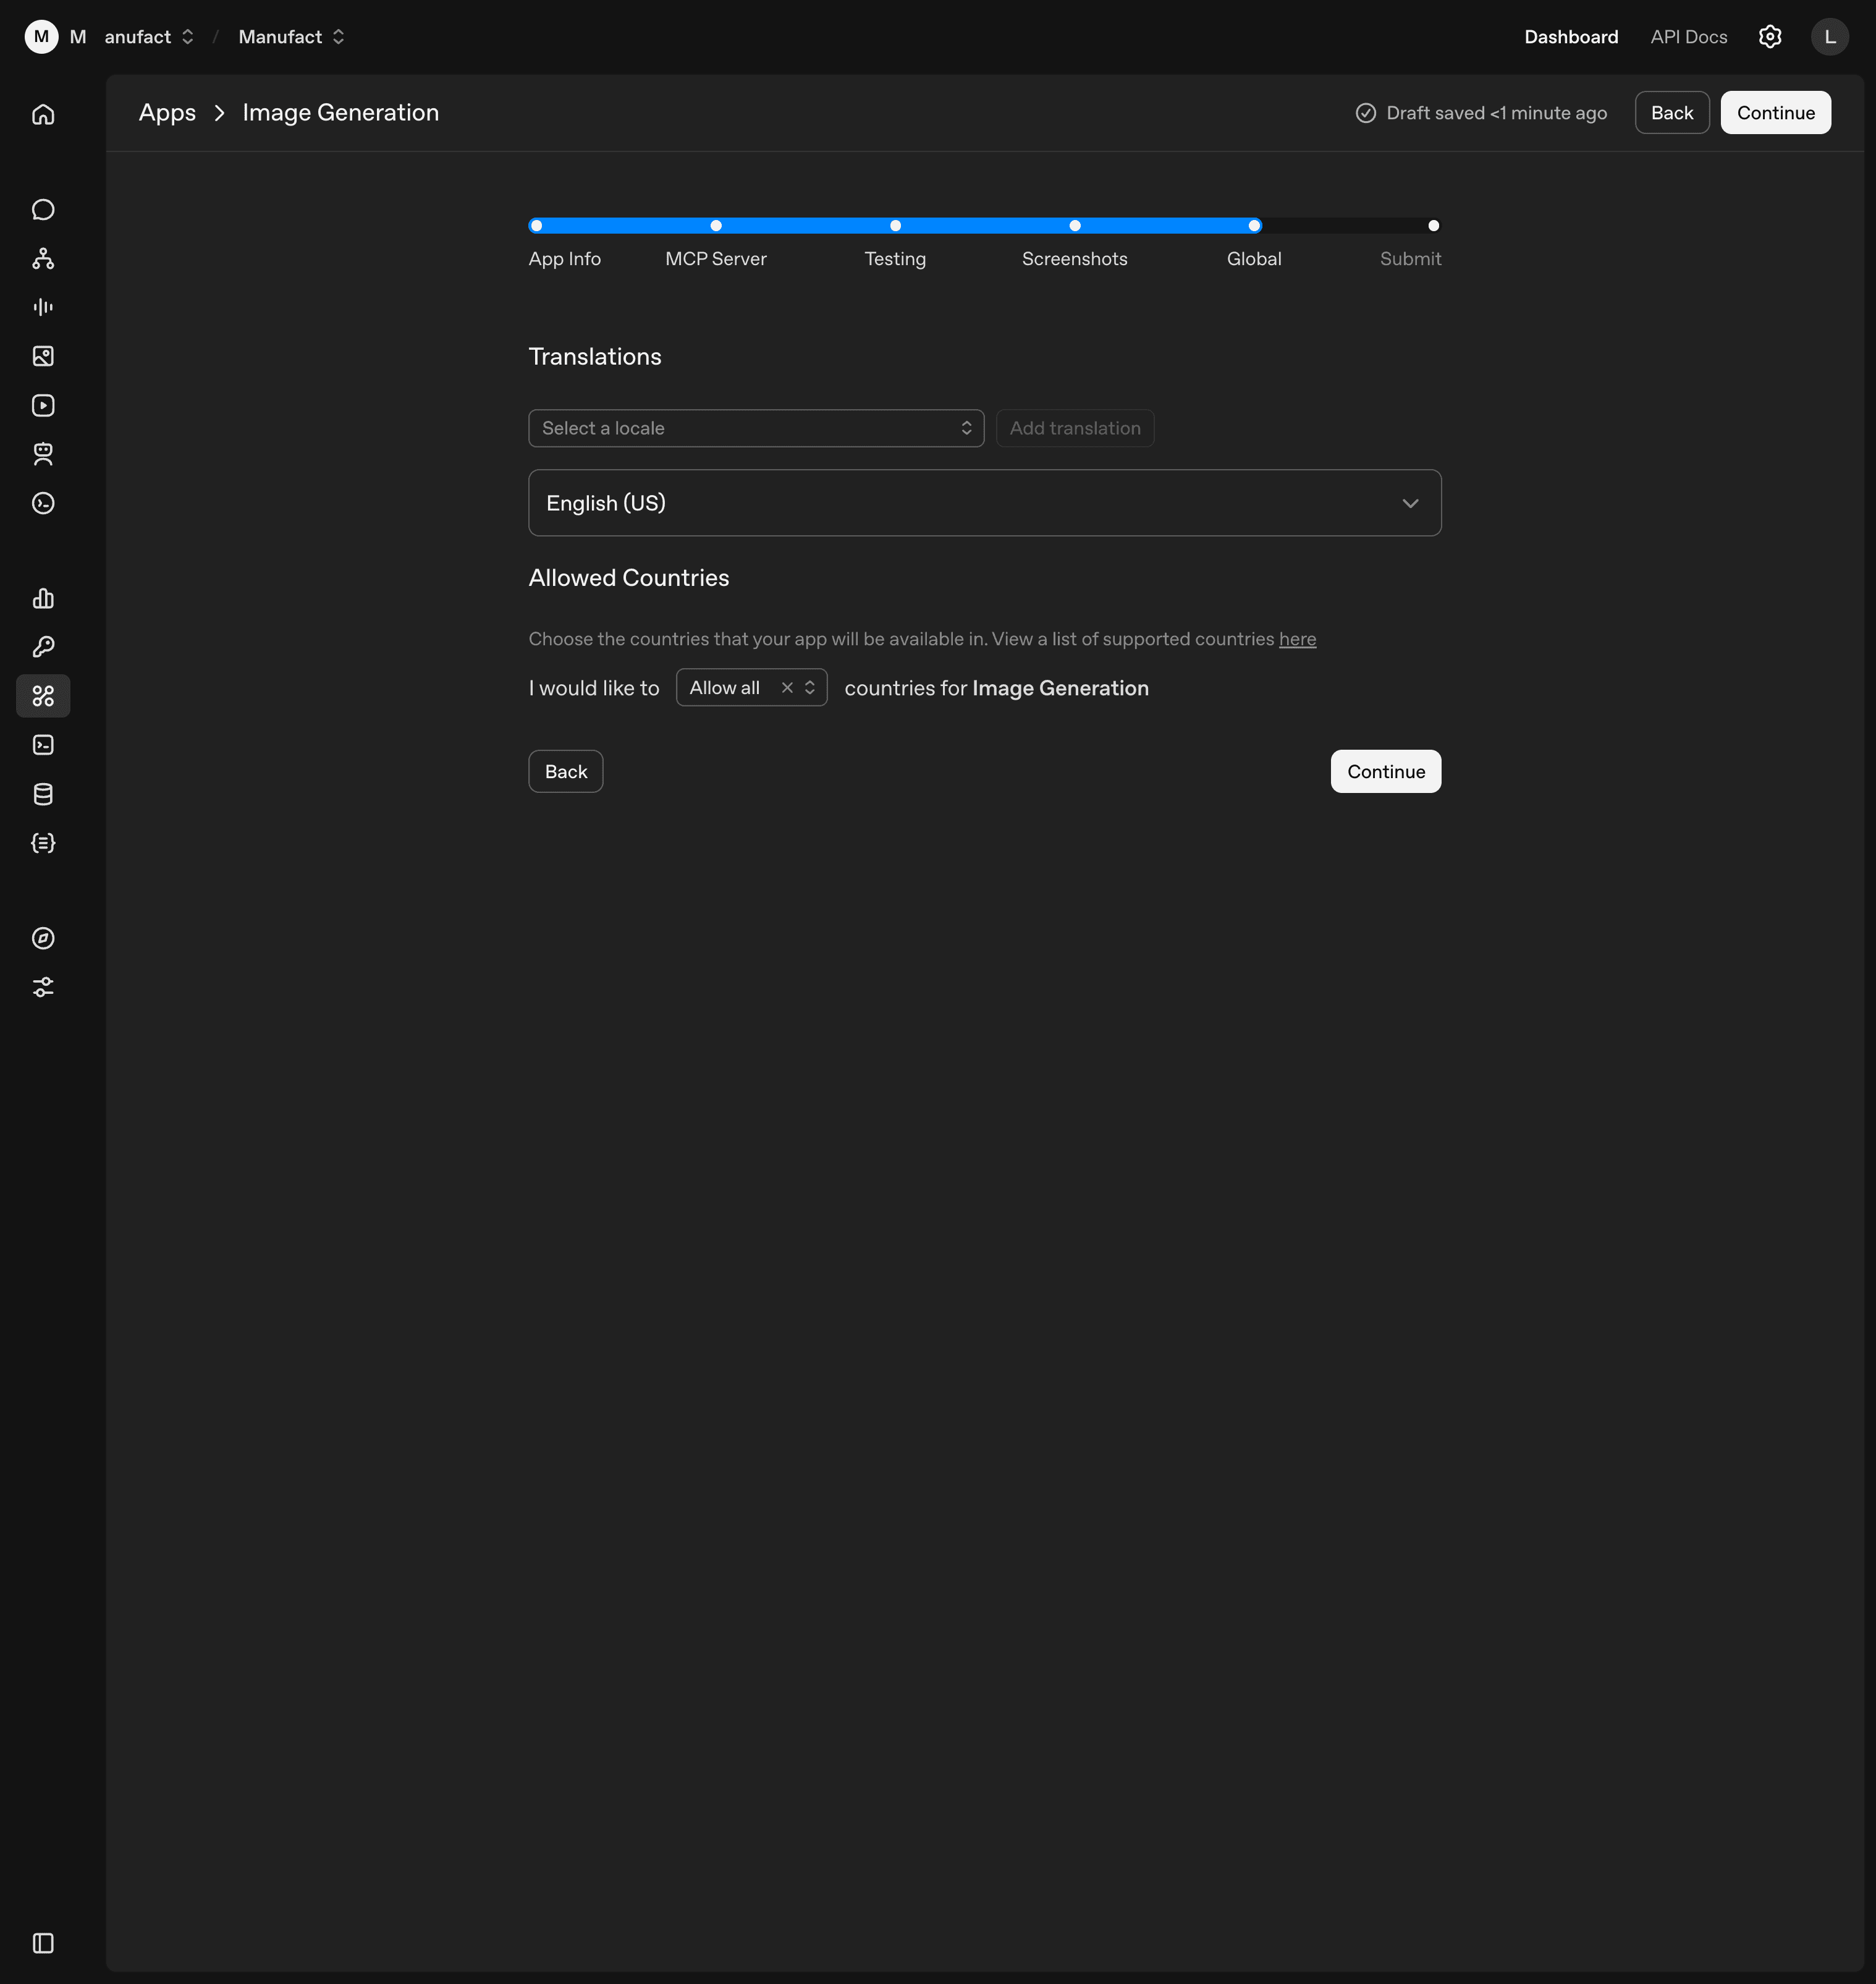
Two settings, both usually left at their defaults. English (US) is the default locale, and you can add others from the picker if your app supports them. Allowed Countries defaults to "Allow all" and the form links to OpenAI's supported-countries list if you need to scope availability geographically.
Step 6: Submit
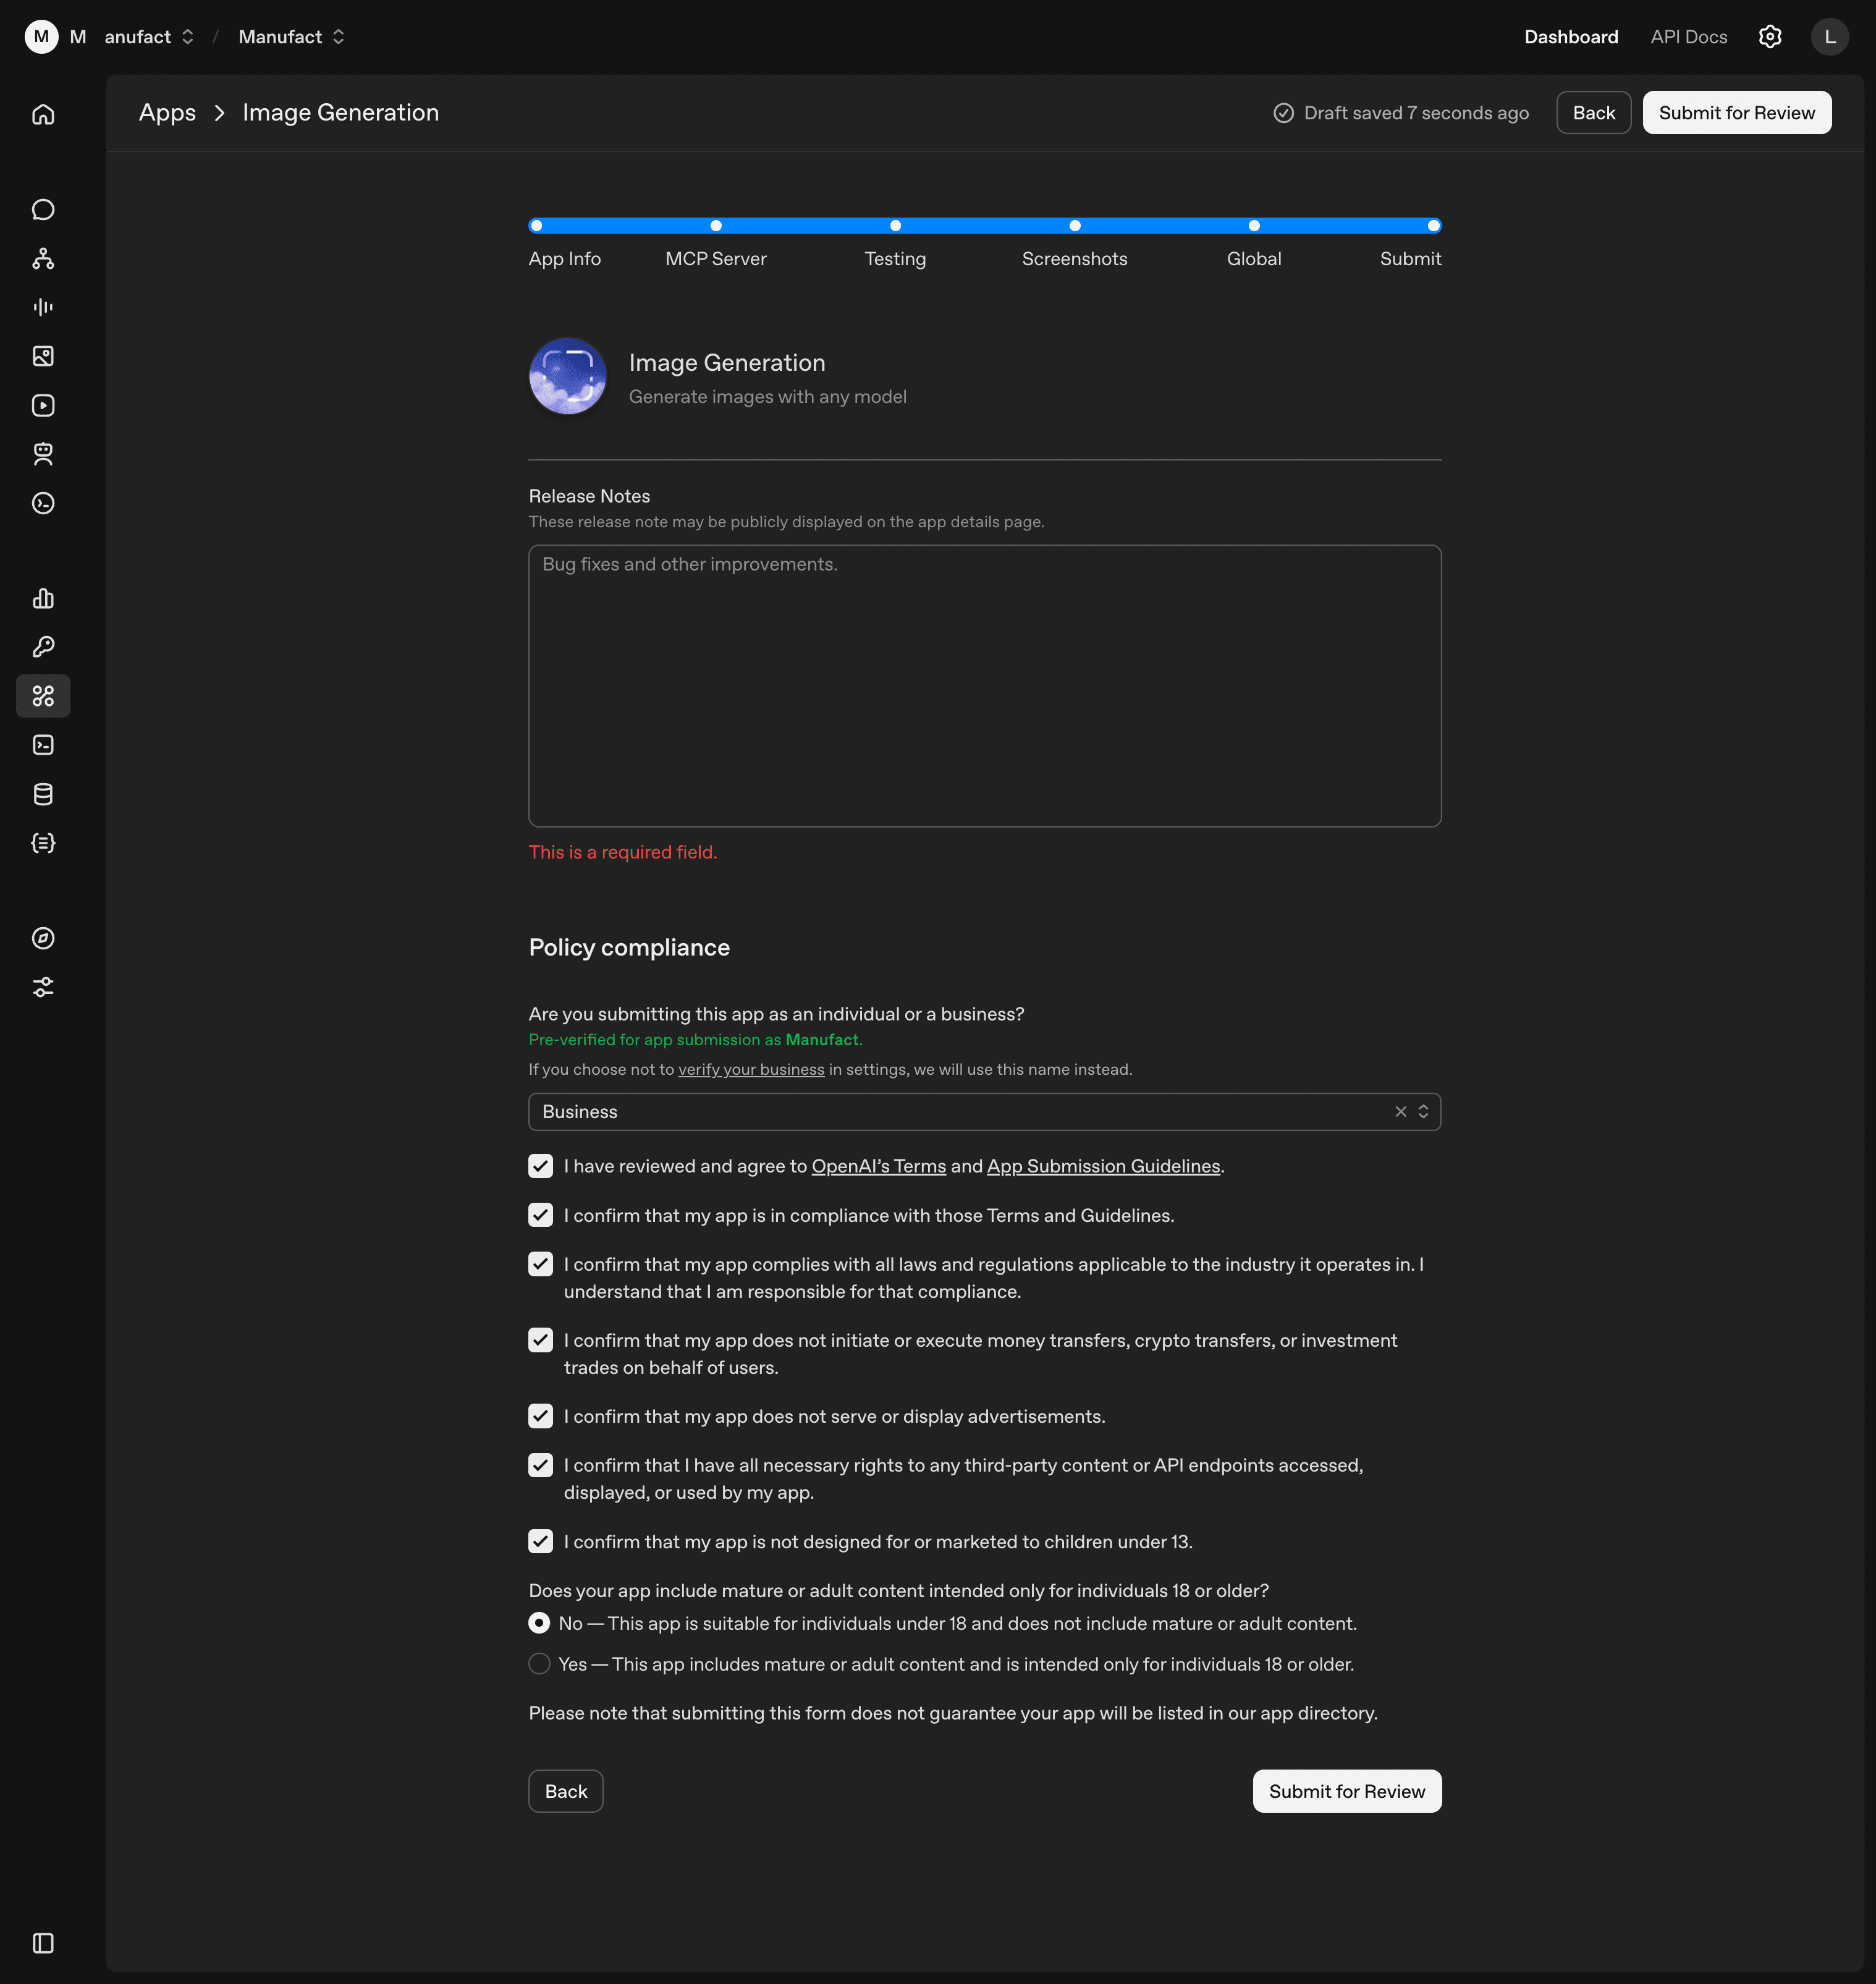
The final section previews your app card and asks for release notes, an Individual/Business selection, and policy confirmations.
Release notes are required. For a first submission, describe what the app is; the placeholder ("Bug fixes and other improvements") is for updates. Notes may be shown publicly.
Individual/Business sets the public developer name. Verified orgs show their org name; unverified accounts fall back to a username.
The policy block is a stack of compliance checkboxes (terms, applicable laws, no money/crypto/investment transfers, no ads, third-party content rights, no marketing to under-13s) plus a Yes/No on mature content intended for 18+. Choose Yes only if your app is genuinely 18+; it gates the listing.
Click Submit for Review. Submission doesn't guarantee a listing.
After submission
Reviews typically take one to two weeks. The most common reasons for delay or rejection:
- Missing or non-compliant logo. Square PNG, no manual rounded corners.
- Screenshot rejections. Wrong width, not 2x retina, baked-in user prompts or model responses, or embedded text that should be localized. Use the Figma template.
- Incomplete test cases. Each tool should appear in at least one positive case, and negative cases should clearly explain when not to trigger.
- Tool annotations that don't match behavior. The booleans are read from your server code, not entered in the form, so a wrong annotation has to be fixed in code and redeployed before re-scanning. Don't mark a tool that writes data as Read Only.
For field-level questions, the canonical reference is OpenAI's Submitting apps to the ChatGPT app directory.
Need help getting listed?
At Manufact, we run your MCP server through automated submission readiness checks for ChatGPT and Anthropic, covering OAuth flows, tool annotations, domain verification, and more. Book a call and we'll walk through your submission with you.